NFT minting tutorial
Estimated completion time: 15 mins
This tutorial provides a step by step guide on how to mint an NFT on Immutable X. It is designed for developers building on Web3 for the first time, so anyone can follow along regardless of prior experience. This has been simplified for educational purposes and we are working on expanding the content.
By the end of this tutorial you will have:
- Prepared an NFT collection
- Deployed a smart contract for your NFT collection
- Minted and listed an NFT
If you get stuck at any point, reach out on the dev-faq and dev-discussion channels in our Discord. Click here to provide feedback on the tutorial or let us know what topics you'd like to see in our documentation.
Step 1: Prerequisites
To follow this tutorial, ensure you have the following installed:
- Windows
- macOS
Node.js allows us to use JavaScript to build and run applications.
Ensure that you get the latest LTS version or you may experience issues following the turorial.
Then check that NodeJS is working by opening powershell or command line and executing the command:
npm -v
Install Yarn
Yarn is an open source package manager. Follow the steps below to install:
Run the following command in powershell.
npm install yarn -g
Homebrew installs the packages needed for this tutorial. Copy the command on the Homebrew website, then run in the terminal.
Install Node.js
Node.js allows us to use JavaScript to build and run applications.
Ensure that you get the latest LTS version or you may experience issues following the turorial.
To install Node, run the following (npm will be installed with Node):
brew install node@18
Install Yarn
Yarn is an open source package manager. Follow the steps below to install:
Run the following command in the terminal.
brew install yarn
Visual Studio Code is the code editor we will be using for this tutorial.
Step 2: Setup MetaMask
To trade cryptocurrencies and NFTs, we need a wallet. For this tutorial, we will use Metamask.
- Open metamask.io to install the browser extension
- Follow the steps in the plugin to create a new wallet, then record and store your seed phrase in a safe location
- Ensure you display test networks
- Change the network selection from Ethereum Mainnet to Sepolia Test Network
- Note down your private key and public address
Changing the network enables us to deploy on a testnet where we can experiment using test Eth. To learn more about transactions on Ethereum work, check out this page from the Ethereum foundation.
Step 3: Obtain SepoliaETH
To deploy our smart contract to the Sepolia test network, we’ll need some test Eth. To get test Eth you can go to the Sepolia faucet and enter your Sepolia account address, then click “Send Me ETH.” It may take a few minutes for the sepoliaETH to arrive.
If this faucet doesn't work, try these alternative faucets:
Step 4: Setup Pinata
Pinata is a service that allows users to host files on the InterPlanetary File System (IPFS) network. We use Pinata to store our NFT metadata as it ensures the authenticity of the file will be verifiable and the file will always be accessible. Follow the steps below to prepare your collection:
You can use the free version for this tutorial, however consider creating a paid account for your real collection to ensure your images can be loaded. Be aware that your images will be publicly hosted on IPFS.
We don't suggest using Pinata in production. Our systems will timeout after 5 seconds if your server does not respond; ensure your providers respond faster. For better performance, use services like AWS S3 to host metadata in production.
- Sign up to Pinata
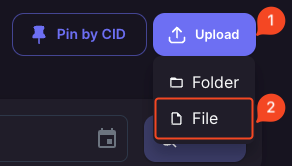
- Prepare 3 images for your NFTs
- Upload an image by pressing Upload and selecting the file

- Upload the remaining 2 images
- Click the view button and note down the URL for each file

Your URLs should have the format: https://gateway.pinata.cloud/ipfs/QmWfjs6CVu4ENgXGNfdPhgaSdzEhCsCfB5XEFUosPFGsNV
Or it may have a dedicated gateway url:
https://emerald-quickest-sloth-734.mypinata.cloud/ipfs/QmPM1BbVbAUB5DRe4L5gogMhVXBv6VSWnvNJyS7PWp1qdR
Step 5: Create Metadata
NFT Metadata contains information about the characteristics and properties of an NFT.
- Open Visual Studio Code
- Create New Folder (Open Folder --> New Folder)
- Press the page icon 3x to create 3 files
- Name the files 1,2 & 3. These are our Token IDs.

Ensure the files are named 1, 2 & 3 or you may run into errors later.
Populate each file with the metadata for the corresponding NFT. You can use the following metadata for your test collection, however make sure to replace each image_URL with the URLs that you created earlier to host your NFT images.
{
  "name": "1st NFT",
  "description": "This is your 1st nft",
  "image_url": "<replace this with your own IPFS picture link>",
  "attack": 123,
  "collectable": true,
  "class": "EnumValue1"
}
{
  "name": "2nd NFT",
  "description": "This is your 2nd nft",
  "image_url": "<replace this with your own IPFS picture link>",
  "attack": 223,
  "collectable": true,
  "class": "EnumValue2"
}
{
  "name": "3rd NFT",
  "description": "This is your 3rd nft",
  "image_url": "<replace this with your own IPFS picture  link>",
  "attack": 323,
  "collectable": true,
  "class": "EnumValue3"
}
Ensure you press save before uploading the folder into Pinata. Double check this by closing the file and re opening - make sure that the values have saved.
Once you have saved your files, upload the folder into Pinata by pressing the upload button and selecting the folder.
Click on the folder name to obtain your metadata API URL. This endpoint is used by the metadata crawler to add metadata to your NFTs when they are minted. Note this down.
The resulting URL should have the format https://gateway.pinata.cloud/ipfs/QmWfKt2pXLnQ2AB5jfS2KYB9K2hxFtgcMNxyndkSGT3yuj.
Click on your metadata API URL and ensure that there are 3 files named 1,2 & 3. Click into each file and confirm the data is correct. If any of them are empty, you will need to reupload your folder.
Step 6: Create Etherscan API Key
An Etherscan API Key is necessary to verify that you're the owner of the smart contract that you're trying to publish. Follow the steps below:
- Navigate to Etherscan
- Sign in (or create a new account)
- Navigate to
API-KEYSand add a new key - Note down the generated API key
![]()

Step 7: Create and deploy NFT contract
Ensure that you have enough SepoliaETH in your wallet. You can check your balance by clicking on the Metamask extension and selecting the Sepolia Test Network. If you don't have enough, you can get some from the Sepolia faucet.
Next we will need to update the variables for our smart contract.
- Clone or download the contracts code from github.
- Unzip the file and open it in Visual Studio Code (File--> Open Folder)
- Follow
deploy/x/README.mdto create and deploy your contract. Exampleyarn hardhat deploy:x:asset --network sepolia --name "Zero to Hero" --symbol Z2H. Note down the Alchemy Sepolia API Key.
It will take ~5-15 minutes to deploy your contract to Sepolia Etherscan 3. Copy the deployed contract address
Paste your contract address into Sepolia Etherscan. It should say contract in the upper left. If this says address, ensure you are on the correct network. If you are on the correct network, you may need to wait a few minutes for the contract to deploy.

Step 8: Create an Immutable X project in the Immutable Hub
Before creating a collection, you must first create a project and environment in the Immutable Hub. The environment is where your collection will reside in.
Step 9: Prepare the imx-examples repository
The imx-examples repository contains code examples using the Unified TypeScript SDK to create a StarkX project, collection, metadata schema, and mint NFTs.
The repo also contains helper scripts to get info about your newly created collection and minted assets.
- Download the imx-examples repo
- Open the folder in your IDE
- Rename
.env.exampleto.envand save - Fill in the following:
| Field Name | Description |
|---|---|
ALCHEMY_API_KEY | The Alchemy API key created during contract deployment from step 7. |
API_KEY | The API key generated from your environment's API Key page in the Immutable Hub. |
OWNER_ACCOUNT_PRIVATE_KEY | Metamask private key from step 2 |
COLLECTION_PROJECT_ID | The Legacy ID from your environment's overview page in the Immutable Hub. |
COLLECTION_CONTRACT_ADDRESS | Deployed contract address from step 7. |
- Save the values added to the
.envfile. - Run
npm installto install the repo dependencies.
Step 10: User registration
Before you can create a collection and mint on Immutable X, you will need to register as a user. Registering as a user creates a Layer 2 wallet and enables us to make transactions on Layer 2.
This is a one time set-up and you won't need to run this command again for the same wallet private key.
Open a terminal in the imx-examples repo folder and run npm run onboarding:user-registration.
Step 11: Register Collection
A collection is a group of NFTs that share a smart contract and each collection belongs to a project. Collections are displayed on the marketplace to end users, e.g. Gods Unchained.
In the imx-examples repo, navigate to the src/onboarding/3-create-collection.ts file and populate and uncomment the following values in the createCollectionRequest object:
| Field Name | Description |
|---|---|
name | Name of your collection. |
description | The description for your collection. |
icon_url | Icon that displays for your collection. |
metadata_api_url | Metadata API URL that we generated earlier (ensure there is no trailing slashes). |
collection_image_url | An image to represent your collection. |
The values for contract_address, owner_public_key, and project_id should come from the values set in the .env file.
If you haven't, register as a user by running the following command: npm run onboarding:user-registration. This is a one time set-up and you won't need to run this command again for the same wallet private key.
Run npm run onboarding:create-collection to create your collection.
Step 12: Create Metadata Schema
A collection's metadata schema describes the properties of the NFTs it can mint, as well as the potential values and types of those properties. These fields can be used as filters in marketplaces later on. Click here to learn more about Metadata Schema.
Navigate to src/onboarding/4-add-metadata-schema.ts and check the metadata schema types in the metadata array from line 39:

You can use the example metadata schema provided here (and in imx-examples), or use your own.
{
  name: 'name',
  type: x.MetadataSchemaRequestTypeEnum.Text,
},
{
  name: 'description',
  type: x.MetadataSchemaRequestTypeEnum.Text,
},
{
  name: 'image_url',
  type: x.MetadataSchemaRequestTypeEnum.Text,
},
{
  name: 'attack',
  type: x.MetadataSchemaRequestTypeEnum.Discrete,
  filterable: true
},
{
  name: 'collectable',
  type: x.MetadataSchemaRequestTypeEnum.Boolean,
  filterable: true,
},
{
  name: 'class',
  type: x.MetadataSchemaRequestTypeEnum.Enum,
  filterable: true,
},
To add metadata schema to the collection, run the command npm run onboarding:add-metadata-schema in the integrated terminal.
Step 13: Mint NFT
Now that we have added your collection to Immutable X, the final step is to add assets to the blockchain by minting them.
Navigate to src/onboarding/5-mint-nfts.ts and check the asset (token) objects to be minted in the tokens array.
Each token object has a id and blueprint field.
- The script will automatically increment the
idvalue for you based on the latestidvalue on the collection. - The value for the
blueprintis a placeholder string, however, it can be a string in any format. For more info about what value to use for theblueprintsee the Deep dive into metadata documentation.
Run npm run onboarding:mint to mint the NFTs listed in the tokens array.
Once the assets have been minted, you can run npm run public:get-assets-info to get the info about the newly minted assets from the Immutable X API.
Once the NFTs have been minted there might be a short delay for the metadata to show up on assets listed with the public:get-assets-info script.
Minting an NFT will trigger the metadata crawler to pull the NFT metadata from the metadata_api_url.
Under normal conditions, the metadata should be crawled within seconds after minting, but could take a couple minutes if there is significant minting load on the platform.
In which case, try re-running the public:get-assets-info script again in a couple minutes.
Step 14: List your NFT
Our assets will now be accessible in our Sepolia Wallet. However, for other users to see them we will need to list them on the marketplace.
- Visit the Sandbox IMX Marketplace
- Click Connet Wallet and follow the prompts
- Click My Assets --> Select an NFT
- Press List for Sale
Step 15: Passport Inventory
Your collection and assets should be visable on the (sandbox) Passport Dashboard._createMdxContent
- Navigate to https://passport.sandbox.immutable.com/ and create an account (or sign in if you've already created a sandbox account).
- Click on
External Walletsin the left-hand menu. - Click
Link a MetaMask walletand link the MetaMask wallet from step 2.
Conclusion
Congratulations on minting and listing an NFT on the Sepolia test network!
This tutorial covered the simplest implementation of minting, however we are continuing to build out the workflow. Feel free to leave any feedback here.
If you'd like to reuse these steps for a mainnet launch, note the following changes:
| Step | Change |
|---|---|
| Step 2 | MetaMask network should use Ethereum Mainnet |
| Step 7 | yarn hardhat deploy:x:asset --network mainnet --name "Zero to Hero" --symbol Z2H |